Hedgehog camera

The situation:
A while ago I built a hedgehog feeding station after seeing a hedgehog in my yard. I found some great information on how to build a cheap and simple feeding station over at thehedgehog.co.uk.The idea:
More recently I decided I wanted to see who was visiting the station and some kind of camera solution was desired.I figured the following requirements would need to be met.
- Video recording triggered by motion detection
- Cheap parts
- Easily powered and connected to my network
The plan:
As I had some of the components lying around I figured using a Raspberry Pi with a camera module would be good for the hardware side. I asked more knowledgeable people than me about doing motion detection on this platform and I was pointed at MotionEyeOs. In the past I had used the Motion software this is based on so it seemed like a good solution.
Using MotionEyeOs on an original RaspberryPi:
As I had an original Raspberry Pi Model B (the one with 256MB ram) and a camera module lying around I downloaded the correct MotionEyeOs image, poped it on an SD card and gave it a go.
I found the MotionEyeOs interface easy to use and setting up the software was pretty straightforward. One curious thing was that you had to set the WiFi network and password over the web interface. This meant to get to the web page the device needed to be plugged in to the wired network. This was not an issue on the original Pi B but would become an issue later.
I found the MotionEyeOs interface easy to use and setting up the software was pretty straightforward. One curious thing was that you had to set the WiFi network and password over the web interface. This meant to get to the web page the device needed to be plugged in to the wired network. This was not an issue on the original Pi B but would become an issue later.
The original PI proved that the software solution would do what I wanted, but it wouldn't detect motion. I presumed the original pi simply didn't have enough horsepower so an upgrade was needed.
Hardware V2:
To overcome the lack of CPU power of the original Pi I went possibly a little OTT and ordered a Pi 3B +, the (current at time of publishing) powerhouse of the raspberry pi lineup. Once it arrived I installed motioneyeos again and after a quick round of playing with the settings it was capturing motion in my living room.
Some things to note are
- That while MotionEyeOS starts by default with motion detection enabled it does not automatically save videos of the motion it sees. There is a separate 'movies' section that is off by default that handles the saving of the video clips. It took me a while to notice this and turn this on.
- The CSI camera connection on the raspberry pi is detected automatically. If you don't get a camera image straight away make sure you've got the camera ribbon cable connected the correct way round. There's only two ways it can be installed so if you're not concentrating when you install it then you have a 50/50 chance of getting it right.
 |
| Remember to turn on 'Movies' |
Power!
So having a raspberry pi outside brings the challenge of how to get power to it. It relies on 5v through a USB connector and there isn't a mains socket in the feeding station. I had a few thoughts on how to power this and came up with the following plan.
I have a mains socket in an outdoor accessible cupboard which I've normally used for plugging in lawnmowers. This is about five feet away from the the feeding station but if I was to route a cable neatly it would follow a route of about twenty feet. I decided to take the mains down to 12v DC using an old power brick I had lying around. 20ft of mains cable is then fed round the car porch got 12v to the feeding station.
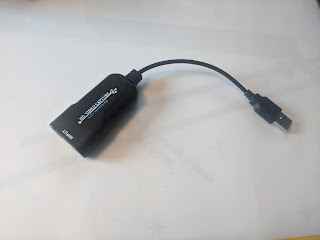
To turn the 12v into something appropriate for the PI I bought one of these.
 |
| 12v to 5v DC-DC converter from ebay. |
Mounting:
I needed a way to mount the camera module, pi and DC-DC converter so it would be easy to install in the feeding station. I found an old takeaway container which was about the right size. I mounted the PI using double sided foam tape, and cut a hole for the camera which was also held in place with the same tape. This was held together with an elastic band and popped in to the feeding station.
This worked but had significant problems.
This worked but had significant problems.
- Hedgehogs are nocturnal, and the camera I was using wasn't a night vision version. This meant that nothing was captured at night.
- The focus of the camera was about 30cm from the lens which meant anything inside the station was out of focus.
Hardware V3:
To fix the camera issues I ordered an IR camera module with a wide angle lens.
 |
| Testing the close-up IR camera module with a shot of Narissia |
I also took this opportunity to switch the Pi 3B+ board to a Pi Zero W. The Zero W has less CPU power than the 3B+ but more than the original Pi 1 I used. It has a big advantage of being about 1/3rd of the price of a 3B+ so if I was going to repeat this setup then it would be good to know that this lower priced version worked.
When this all arrived I plugged together and new I would have an issue setting the WiFi network name and password in MotionEyeOS as the Zero W does not have a wired network port. I got around this issue by first putting the MotionEyeOS image on the SD card but before booting it I mounted it on a Linux pc and edited the /etc/wpa_supplicant.conf file on the /data partition. I believe there are other ways around this issue on computers without a wired network port which you'll have to investigate yourself on the MotionEyeOS website.
Once this was up and running I installed it in the takeaway container ready for action.
 |
| Pi, camera board and 5v DC converter in a takeaway container |
Then it was time to install it in back in the feeding station.

 |
| The problem with this position is that it captures the rear end of a feeding hedgehog. |

After moving the camera to the side, I finally caught video of a visitor :)

Comments
Post a Comment